
@Scope 注解失效了?咋回事
来源:江南一点雨
scope 属性,相信大家都知道,一共有六种:
取值含义生效条件singleton表示这个 Bean 是单例的,在 Spring 容器中,只会存在一个实例。prototype多例模式,每次从 Spring 容器中获取 Bean 的时候,才会创建 Bean 的实例出来。request当有一个新的请求到达的时候,会创建一个 Bean 的实例处理。web 环境下生效session当有一个新的会话的时候,会创建一个 Bean 的实例出来。web 环境下生效application这个表示在项目的整个生命周期中,只有一个 Bean。web 环境下生效gloablsession有点类似于 application,但是这个是在 portlet 环境下使用的。web 环境下生效这个用法也很简单,通过配置就可以设置一个 Bean 是否为单例模式。
1. 问题呈现
今天我要说的不是基础用法,是另外一个问题,假设我现在有如下两个 Bean:
@Servicepublic class UserService{
@AutowiredUserDao userDao;
}
@Repositorypublic class UserDao{
}
在 UserService 中注入 UserDao,由于两者都没有声明 scope,所以默认都是单例的。
现在,如果我给 UserDao 设置 Scope,如下:
@Repository@Scope(value = "prototype")
public class UserDao{
}
这个 prototype 表示如果我们从 Spring 容器中多次获取 UserDao 的实例,拿到的不是同一个实例。
但是!!!
我现在是在 UserService 里边注入 UserDao 的,UserService 是单例的,也就是 UserService 只初始化了一次,按理说 UserService 也只跟 Spring 容器要了一次 UserDao,这就导致我们最终从 UserService 中拿到的 UserDao 始终是同一个。
测试方式如下:
AnnotationConfigApplicationContext ctx = new AnnotationConfigApplicationContext(JavaConfig.class);
UserService us = ctx.getBean(UserService.class);
UserService us2 = ctx.getBean(UserService.class);
System.out.println(us.userDao == us2.userDao);
最终打印结果为 true。
其实,这个也没啥问题,因为你确实只跟 Spring 容器只要了一次 UserDao。但是现在如果我的需求就是 UserService 是单例,UserDao 每次都获取不同的实例呢?阁下该如何应对?
2. 解决方案
Spring 已经考虑到这个问题了,解决方案就是通过代理来实现。
在我们使用 @Scope 注解的时候,该注解还有另外一个属性 proxyMode,这个属性的取值有四种,如下:
public enumScopedProxyMode {
DEFAULT,
NO,
INTERFACES,
TARGET_CLASS
}
DEFAULT:这个是默认值,默认就是 NO,即不使用代理。NO:不使用代理。INTERFACES:使用 JDK 动态代理,要求当前 Bean 得有接口。TARGET_CLASS:使用 CGLIB 动态代理。可以通过设置 proxyMode 属性来为 Bean 产生动态代理对象,进而实现 Bean 的多例。
现在我修改 UserDao 上的注解,如下:
@Repository@Scope(value = "prototype",proxyMode = ScopedProxyMode.TARGET_CLASS)
public class UserDao{
}
此时,再去执行测试:
AnnotationConfigApplicationContext ctx = new AnnotationConfigApplicationContext(JavaConfig.class);
UserService us = ctx.getBean(UserService.class);
UserService us2 = ctx.getBean(UserService.class);
System.out.println(us==us2);
System.out.println("us.userDao = "+ us.userDao);
System.out.println("us2.userDao = "+ us2.userDao);
System.out.println("us.userDao.getClass() = "+ us.userDao.getClass());
最终打印结果如下:

可以看到,UserService 是单例,userDao 确实是不同实例了,并且 userDao 是一个 CGLIB 动态代理对象。
那么,如果是 XML 配置该怎么配置呢?
<bean class="org.javaboy.demo.p2.UserDao" id="userDao" scope="prototype"> <aop:scoped-proxy/></bean><bean class="org.javaboy.demo.p2.UserService"> <property name="userDao" ref="userDao"/></bean>这个跟普通的 AOP 配置方式不一样,不过也很好理解,对照上面的注解配置来理解即可。
3. 源码分析
那么这一切是怎么实现的呢?
Spring 中提供了专门的工具方法 AnnotationConfigUtils#applyScopedProxyMode 来处理此事:
static BeanDefinitionHolder applyScopedProxyMode(
ScopeMetadata metadata, BeanDefinitionHolder definition, BeanDefinitionRegistry registry){
ScopedProxyMode scopedProxyMode = metadata.getScopedProxyMode();
if(scopedProxyMode.equals(ScopedProxyMode.NO)) {
returndefinition;
}
booleanproxyTargetClass = scopedProxyMode.equals(ScopedProxyMode.TARGET_CLASS);
returnScopedProxyCreator.createScopedProxy(definition, registry, proxyTargetClass);
}
从这里我们可以看到,如果代理模式是 NO/Default 的话,那么直接返回原本的 definition,否则就要调用 ScopedProxyCreator.createScopedProxy 方法去生成代理对象了,这里还涉及到一个 proxyTargetClass 参数,这个参数是用来判断是 JDK 动态代理还是 CGLIB 动态代理的,如果设置了 proxyMode = ScopedProxyMode.TARGET_CLASS 那么 proxyTargetClass 变量就为 true,表示 CGLIB 动态代理,否则就是 JDK 动态代理。
来继续看 ScopedProxyCreator.createScopedProxy 方法,该方法内部调用到了 ScopedProxyUtils#createScopedProxy 方法:
public static BeanDefinitionHolder createScopedProxy(BeanDefinitionHolder definition,
BeanDefinitionRegistry registry, boolean proxyTargetClass){
String originalBeanName = definition.getBeanName();
BeanDefinition targetDefinition = definition.getBeanDefinition();
String targetBeanName = getTargetBeanName(originalBeanName);
// Create a scoped proxy definition for the original bean name, // "hiding" the target bean in an internal target definition. RootBeanDefinition proxyDefinition = new RootBeanDefinition(ScopedProxyFactoryBean.class);
proxyDefinition.setDecoratedDefinition(newBeanDefinitionHolder(targetDefinition, targetBeanName));
proxyDefinition.setOriginatingBeanDefinition(targetDefinition);
proxyDefinition.setSource(definition.getSource());
proxyDefinition.setRole(targetDefinition.getRole());
proxyDefinition.getPropertyValues().add("targetBeanName", targetBeanName);
if(proxyTargetClass) {
targetDefinition.setAttribute(AutoProxyUtils.PRESERVE_TARGET_CLASS_ATTRIBUTE, Boolean.TRUE);
// ScopedProxyFactoryBeans "proxyTargetClass" default is TRUE, so we dont need to set it explicitly here.}
else{
proxyDefinition.getPropertyValues().add("proxyTargetClass", Boolean.FALSE);
}
// Copy autowire settings from original bean definition.proxyDefinition.setAutowireCandidate(targetDefinition.isAutowireCandidate());
proxyDefinition.setPrimary(targetDefinition.isPrimary());
if (targetDefinition instanceofAbstractBeanDefinition abd) {
proxyDefinition.copyQualifiersFrom(abd);
}
// The target bean should be ignored in favor of the scoped proxy. targetDefinition.setAutowireCandidate(false);
targetDefinition.setPrimary(false);
// Register the target bean as separate bean in the factory.registry.registerBeanDefinition(targetBeanName, targetDefinition);
// Return the scoped proxy definition as primary bean definition // (potentially an inner bean). return newBeanDefinitionHolder(proxyDefinition, originalBeanName, definition.getAliases());
}
这个里边的代码其实没啥好解释的,就是创建了一个新的 RootBeanDefinition 对象,变量名就是 proxyDefinition,从这里也能看出来这就是用来创建代理对象的,然后把之前旧的 BeanDefinition 对象的各个属性值都拷贝进去,最后把新的代理的 proxyDefinition 返回。
这里有一个值得关注的点就是创建 proxyDefinition 的时候,构造方法传入的参数是 ScopedProxyFactoryBean,意思就是这个 BeanDefinition 将来要产生的对象是 ScopedProxyFactoryBean 的对象,那我们继续来看 ScopedProxyFactoryBean,从名字上可以看出来这是一个 FactoryBean:
public class ScopedProxyFactoryBean extends ProxyConfig implements FactoryBean<Object>, BeanFactoryAware, AopInfrastructureBean{
private final SimpleBeanTargetSource scopedTargetSource = newSimpleBeanTargetSource();
@Nullable privateString targetBeanName;
@Nullable privateObject proxy;
public ScopedProxyFactoryBean(){
setProxyTargetClass(true);
}
@Override public void setBeanFactory(BeanFactory beanFactory){
this.scopedTargetSource.setBeanFactory(beanFactory);
ProxyFactory pf = newProxyFactory();
pf.copyFrom(this);
pf.setTargetSource(this.scopedTargetSource);
Class<?> beanType = beanFactory.getType(this.targetBeanName);
if(!isProxyTargetClass() || beanType.isInterface() || Modifier.isPrivate(beanType.getModifiers())) {
pf.setInterfaces(ClassUtils.getAllInterfacesForClass(beanType, cbf.getBeanClassLoader()));
}
ScopedObject scopedObject = new DefaultScopedObject(cbf, this.scopedTargetSource.getTargetBeanName());
pf.addAdvice(newDelegatingIntroductionInterceptor(scopedObject));
pf.addInterface(AopInfrastructureBean.class);
this.proxy = pf.getProxy(cbf.getBeanClassLoader());
}
@Override public Object getObject(){
return this.proxy;
}
@Override publicClass getObjectType() {
if (this.proxy != null) {
return this.proxy.getClass();
}
return this.scopedTargetSource.getTargetClass();
}
@Override public boolean isSingleton(){
return true;
}
}
这里的 getObject 方法返回的就是 proxy 对象,而 proxy 对象是在 setBeanFactory 方法中初始化的(setBeanFactory 方法是在 Bean 初始化之后,属性填充完毕之后触发调用的)。
setBeanFactory 方法中就是去创建代理对象,设置的 targetSource 就是 scopedTargetSource,这个里边封装了被代理的对象,scopedTargetSource 是一个 SimpleBeanTargetSource 类型的 Bean,SimpleBeanTargetSource 的特点就是每次获取代理对象的时候,都会重新去调用 getTarget 方法,而在 SimpleBeanTargetSource 的 getTarget 方法中就是根据原始的 Bean 名称去 Spring 容器中查找 Bean 并返回,也就是说,在这里代理对象中,被代理的对象实际上就是原始的 Bean,对应上文案例来说,被代理的对象就是 userDao。
另外一个需要关注的点就是添加的拦截器 DelegatingIntroductionInterceptor 了,这是为代理对象增强的内容(setBeanFactory 方法中其他内容都是常规的 AOP 代码,我就不多说了,不熟悉的小伙伴可以看看松哥最近录制的 Spring 源码视频哦Spring源码应该怎么学?)。
DelegatingIntroductionInterceptor 拦截器传入了 scopedObject 作为参数,这个参数实际上就表示了被代理的对象,也就是被代理的对象是一个 ScopedObject。
public class DelegatingIntroductionInterceptor extends IntroductionInfoSupport implements IntroductionInterceptor{
@Nullable privateObject delegate;
public DelegatingIntroductionInterceptor(Object delegate){
init(delegate);
}
protected DelegatingIntroductionInterceptor(){
init(this);
}
private void init(Object delegate){
this.delegate = delegate;
implementInterfacesOnObject(delegate);
suppressInterface(IntroductionInterceptor.class);
suppressInterface(DynamicIntroductionAdvice.class);
}
@Override @Nullable public Object invoke(MethodInvocation mi) throws Throwable{
if(isMethodOnIntroducedInterface(mi)) {
Object retVal = AopUtils.invokeJoinpointUsingReflection(this.delegate, mi.getMethod(), mi.getArguments());
if (retVal == this.delegate && mi instanceofProxyMethodInvocation pmi) {
Object proxy = pmi.getProxy();
if(mi.getMethod().getReturnType().isInstance(proxy)) {
retVal = proxy;
}
}
returnretVal;
}
returndoProceed(mi);
}
@Nullable protected Object doProceed(MethodInvocation mi) throws Throwable{
returnmi.proceed();
}
}
DelegatingIntroductionInterceptor 实现了 IntroductionInterceptor 接口,这就是典型的引介增强,这个松哥之前也写过文章专门跟大家讲过:Spring 中一个少见的引介增强 IntroductionAdvisor,看过之前的文章这里的内容应该都能懂。由于是引介增强,所以最终生成的代理对象,既是 UserDao 的实例,也是 ScopedObject 的实例。
4. 小结
经过上面的分析,我们可以得出如下几个结论:
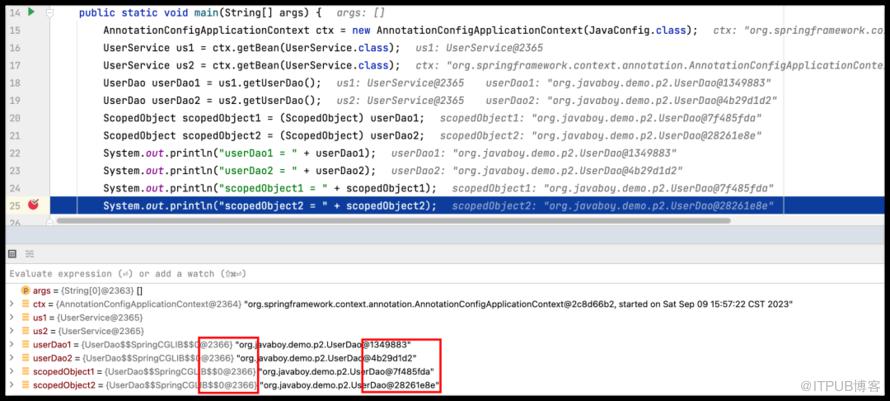
从 UserService 中多次获取到的 UserDao,其实也是 ScopedObject 对象。AnnotationConfigApplicationContext ctx = new AnnotationConfigApplicationContext(JavaConfig.class);
UserService us1 = ctx.getBean(UserService.class);
UserService us2 = ctx.getBean(UserService.class);
UserDao userDao1 = us1.getUserDao();
UserDao userDao2 = us2.getUserDao();
ScopedObject scopedObject1 = (ScopedObject) userDao1;
ScopedObject scopedObject2 = (ScopedObject) userDao2;
System.out.println("userDao1 = "+ userDao1);
System.out.println("userDao2 = "+ userDao2);
System.out.println("scopedObject1 = "+ scopedObject1);
System.out.println("scopedObject2 = "+ scopedObject2);
上面这段代码不会报错,这就是引介增强。
生成的代理对象本身其实是同一个,因为 UserService 是单例的,毕竟只注入一次 UserDao,但是代理对象中被代理的 Bean 则是会变化的。表现出来的现象就是第一点中的四个对象,如果去比较其内存地址,userDao1、userDao2、scopedObject1 以及 scopedObject2 是同一个内存地址,因为是同一个代理对象。
但是被代理的对象则是不同的。DEBUG 之后大家可以看到,前面四个表示代理对象的地址都是同一个,后面被代理的 UserDao 则是不同的对象。
出现这个现象的原因,就是在 ScopedProxyFactoryBean 的 setBeanFactory 方法中,我们设置的 TargetSource 是一个 SimpleBeanTargetSource,这个 TargetSource 的特点就是每次代理的时候,都会去 Spring 容器中查找 Bean,而由于 UserDao 在 Spring 容器中是多例的,因此 Spring 每次返回的 UserDao 就不是同一个,就实现了 UserDao 的多例:
public class SimpleBeanTargetSource extends AbstractBeanFactoryBasedTargetSource{
@Override public Object getTarget() throws Exception{
returngetBeanFactory().getBean(getTargetBeanName());
}
}
对于第二点的内容,如果小伙伴们还不理解,可以翻看松哥之前的文章:AOP 中被代理的对象是单例的吗?。
好啦,现在小伙伴们搞明白怎么回事了吧~
扫一扫,关注我们